Add A Attractive SlideShow Widget for Blogger Blog
jQuery is a compressive form of JavaScript and has great ability to improve blog appearance. As a developer point of view, it seems to be one of the greatest language which can easily modified your existing CSS entities as previous we launched a tricks, which enable Bloggers blog to displayAdsense ad in between the articles, only jQuery make it possible and you can read complete article from here.But here we talking about slideshow widget jQuery enables user to easily make slideshow widget that's why we are using it. If we talk about slideshow widget, it has very useful application in blogs you can represent important article, pages and services to readers in a professional manner. Many big blogs generally use this widget, if you are also interested to use this widget for Blogger blog then follow the steps.
How To Install Slideshow Widget To Blog
- Log in to Blogger dashboard.
- Click on your blog title and then choose Layout option from left side menu.
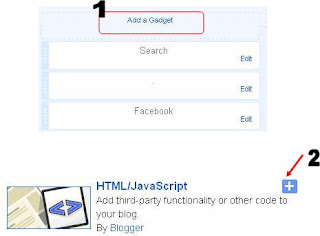
- Click Add a Gadget button and choose HTML / JavaScript from list.

- Now paste the following code within the text box appeared.
<!--Code at www.allbloggingtricks.com-->
<script src="http://ajax.googleapis.com/ajax/libs/jquery/1.4.2/jquery.min.js" type="text/javascript"></script>
<script src="http://s3slider-original.googlecode.com/svn/trunk/s3Slider.js" type="text/javascript"></script>
<script type="text/javascript">
    $(document).ready(function() {
   $('#btrix_slider3').s3Slider({
      timeOut: 3000
   });
});
</script>
<style>
#btrix_slider3 {
   width: 590px; /* Keep it 20px-40PX greater than ACTUAL Image size */
   height: 335px;
   position: relative;
   overflow: hidden;
   margin-left: 0;
}
#btrix_slider3Content {
   width: 590px;
   position: absolute;
   top: 0;
   margin-left: 0;
}
.btrix_slider3Image {
   float: left;
   position: relative;
   display: none;  top: 0;
   border:1px solid #ddd;
}
.btrix_slider3Image span {
position: absolute;
    font: 10px/15px sans-serif,Arial, Helvetica;
    padding: 10px 10px;
    background-color: #000;
    color: #fff;
    filter:'alpha(opacity=70)';
    -moz-opacity: .5;
    -khtml-opacity: .5;
    opacity: .5;
    text-align:justify;
}
.btrix_slider3Image span a {
text-decoration:underline;
color:#FE6602;
}
.clear {
   clear: both;
}
.top {
    top: 0;
    left: 0;
    width: 570px !important;
    height: 70px;
}
.bottom {
    bottom: 0;
    left: 0;
    width: 570px !important;
    height:90px;
}
.left {
    left: 0;
    top: 0;
    width: 110px !important;
    height: 335px;
}
.right {
    right: 0;
    bottom: 0;
    width: 80px !important;
    height: 319px;
}
</style>

<br />
<div id="btrix_slider3">
<ul id="btrix_slider3Content">
<li class="btrix_slider3Image">
<img src="https://blogger.googleusercontent.com/img/b/R29vZ2xl/AVvXsEgo7w1VXN4nJLHBNEQsyxnSdxUwM9873OUvnUFOmv665s2Skcdd30_i7dVuDqs3Yb8hqfqj3U0uY9Iec-yHTaKIZTMmnujln03uCtfzskZTN_LlZ4RYlexQ88pgTc3wvBNRiOx_Akrj-Wo/s1600/1.jpg" />
<span class="left"><h3>
HEADING HERE</h3>
DESCRIPTION HERE</span>
</li>
<li class="btrix_slider3Image">
<img src="https://blogger.googleusercontent.com/img/b/R29vZ2xl/AVvXsEjrl5JX_tmfiZY5ASVS1DrU4-Zth9eb3hzM25uTnWU82ASO2pbJzAj83vihEQ40XEJbOPKFDpCaPx6WS6U3UX81_DXxC_ZM8yQ5HwftIOMESO6Cbbbw8X8agm0i-s8aqsUVSpSnyhyphenhyphengDyw/s1600/2.jpg" />
<span class="left"><h3>
HEADING HERE</h3>
DESCRIPTION HERE</span>
</li>
<li class="btrix_slider3Image">
<img src="https://blogger.googleusercontent.com/img/b/R29vZ2xl/AVvXsEg-7iiEAHYa0n4WRaBxdSXm_EzV4erkUYxkT1XhIEBb2PT0N49Y6PFC63KKRzQCMx6ulSc_0Mm00MeL_1nIY7Hs3kFH8h_oYQPvcbtytmq0bU4c3hxUeBbzZ6ObsGA7_5EEngjvFmiTWRI/s1600/3.png" />
<span class="top"><h3>
HEADING HERE</h3>
DESCRIPTION HERE</span>
</li>
<li class="btrix_slider3Image">
<img src="https://blogger.googleusercontent.com/img/b/R29vZ2xl/AVvXsEgRtWrOO9lXKDxFmDTtlB_gbAekVxFELuSCPwCGKjDa-YgYXKQwlzT29JXw0FCQpqdtRZ4PKDqhqTqEwAaQlEUv-6LoXucusNtf3_ucBxrZpUzwxhHHcSxY33TFKm5DzZ8kR2tUACp8GFQ/s1600/5.jpg" />
<span class="bottom"><h3>
HEADING HERE</h3>
DESCRIPTION HERE</span>
</li>
<li class="btrix_slider3Image">
<img src="https://blogger.googleusercontent.com/img/b/R29vZ2xl/AVvXsEg5KjfDugzUMbdTqDSiT_hXJrjQH7HugRuqxFdSMb_D7_fvnR93b4mM-3ubfR9lygjgWEDYvPATRIkHtWe7FyikXfounYS5uESXAXewdUpuF7yZhlGrp7r-BaA7vsadMf4nB8d_ys4WyPo/s1600/4.png" />
<span class="bottom"><h3>
HEADING HERE</h3>
DESCRIPTION HERE</span>
</li>
<div class="clear btrix_slider3Image">
</div>
</ul>
</div>
<br />
<!--Code at www.allbloggingtricks.com-->
- And drag this widget from sidebar to above the Blog Posts area as in figure below.
Modification
- Replace HEADING HERE and DESCRIPTION HERE with corresponding image details.
- If you want to use different image, change all URL with other image URLs.


