Make A Good Looking Navigation Menu ( Step by Step Tutorial )
If you are searching on Google for a professional navigation bar which attract visitors and fit perfectly on your blog theme then you are at right place. Most of the people, who are just new to web designing or not understand enough web designing find difficulty to integrate navigation bar with blog theme.
So the tutorial given below comprises the basic idea to make menu bar so that beginner web designers can make their own menu bar according to their choice. You can choose font, color, background-color, border etc. like property freely. This tutorial uses simple CSS property and HTML tags. Or you can choose the high quality navigation bar created by our team
- Horizontal menu bar in google style
- Drop down menu in Facebook style
- Drop down menu for blogger blog
- Black Drop down menu for blogger blog
Hence if you want to make your own menu bar then move to the tutorial
How To Make Navigation Menu Bar:-
We will make navigation menu with the help unordered list <ul>, you can make your blog to look from attractive with list from here.The first thing is to create an HTML unordered list <ul> like this
<ul id="menubar">
   <li><a href="#">Home</a></li>
   <li><a href="#">About</a></li>
   <li><a href="#">Service</a></li>
   <li><a href="#">Contact</a></li>
</ul>
It will create following output

#menubar
  {
    list-style-type:none;
    margin:0;
    padding:0;
    overflow:hidden;
  }
It will remove all circles which is at starting of list.
#menubar li
   {
     float:left;
     display:inline;
   }

#menubar li a, #menubar li a:link, #menubar li a:visited
   {
     display:block;
     width:120px;
     font-weight:bold;
     color:#FFFFFF;
     background-color:#98bf21;
     padding:4px;
     text-align:center;
     text-decoration:none;
   }

Figure given above explain the full working of above code.
To change the background color on mouse over
#menubar li a:hover, #menubar li a:active
  {
   background-color:#7A991A;
  }
The overall CSS properties will look like this
#menubar
  {
    list-style-type:none;
    margin:0;
    padding:0;
    overflow:hidden;
  }

#menubar li
   {
     float:left;

   }
#menubar li a, #menubar li a:link, #menubar li a:visited
   {
     display:block;
     width:120px;
     font-weight:bold;
     color:#FFFFFF;
     background-color:#98bf21;
     padding:4px;
     text-align:center;
     text-decoration:none;
   }

#menubar li a:hover, #menubar li a:active
  {
   background-color:#7A991A;
  }
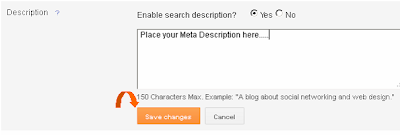
Add Meta Description To Blogger Post Individually
Blogger has now become more friendly with its new updated features. Blogger now finally introduced most awaited SEO features for Google hosted blogspot blog. Blogger team is trying to get closer to its biggest competitor Wordpress. Now you have no need to hack template for addingmeta tags. You can easily add meta description, meta tag to not only for your Blog homepage but also for individual posts or static pages. So lets see learn the tutorial.
Go to Settings / Search preferences, Under Meta tag / Description, click "Edit" and select "Yes" , Now write a meta description about your blog in space provide.
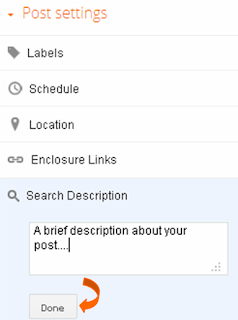
While writing a new post in blogger post editor then you will find a new option called "Search Description" under "Post Settings", where you can add a short description of your individual post.
Finally I want to say that if you find difficulty in adding meta description then you can drop your comment below regarding your problem.
Read More
How to Add Meta Tag And Description:-
Login to New Blogger Dashboard. Make a new post in post editor, if you see the Search Description at right menu bar then there is no need to add the the following code in template. If you don't see the Search Description option in menu bar then go to Template / Edit HTML. Download the full template before making any changes in it.( More Info) - Find following piece of code in blogger template.
<b:skin><
Add Description To Your Post:-

How to Add Table to Blogger Blog Post
Currently it is not possible to add table in Blogger post through compose tab because blogger doesn't provide that option. If any one want to add table in blogger blog then it can be added by adding HTML code in HTML body of Blog post.
 As you can see through the HTML programming there are three <tr> tag which defines three rows of the table and <th> tag defines table heading wheres <td> defines table data of the table andborder=1 defines the border width. Forth row may be easily inserted in it by adding the following code.


So you seen that how easily one can easily add a table to post without any knowledge of HTML. If anyone find difficulty in placing the HTML code then comments are always open for that.
Read More
How To Add Table To Blogger Post:-
How To Create A HTML Table
First of all we will create a HTML table and later used it with blogger.<table border=1> <tr> <th>Table heading 1</th> <th>Table heading 2</th> <th>Table heading 3</th> </tr> <tr> <td>Row 1 Data 1</td> <td>Row 1 Data 2</td> <td>Row 1 Data 3</td> </tr> <tr> <td>Row 2 Data 1</td> <td>Row 2 Data 2</td> <td>Row 2 Data 3</td> </tr> </table>

<table border=1> <tr> <th>Table heading 1</th> <th>Table heading 2</th> <th>Table heading 3</th> </tr> <tr> <td>Row 1 Data 1</td> <td>Row 1 Data 2</td> <td>Row 1 Data 3</td> </tr> <tr> <td>Row 2 Data 1</td> <td>Row 2 Data 2</td> <td>Row 2 Data 3</td> </tr> <tr><td>Row 3 Data 1</td><td>Row 3 Data 2</td><td>Row 3 Data 3</td></tr></table>


How to Add HTMl code to blogger Post:
- In blogger dashboard.
Create a New post. And Paste the HTML code in Edit HTML page.

Add A Attractive SlideShow Widget for Blogger Blog
jQuery is a compressive form of JavaScript and has great ability to improve blog appearance. As a developer point of view, it seems to be one of the greatest language which can easily modified your existing CSS entities as previous we launched a tricks, which enable Bloggers blog to displayAdsense ad in between the articles, only jQuery make it possible and you can read complete article from here.
But here we talking about slideshow widget jQuery enables user to easily make slideshow widget that's why we are using it. If we talk about slideshow widget, it has very useful application in blogs you can represent important article, pages and services to readers in a professional manner. Many big blogs generally use this widget, if you are also interested to use this widget for Blogger blog then follow the steps.
 Finally click Save arrangement and see the result on your blog.
Read More
But here we talking about slideshow widget jQuery enables user to easily make slideshow widget that's why we are using it. If we talk about slideshow widget, it has very useful application in blogs you can represent important article, pages and services to readers in a professional manner. Many big blogs generally use this widget, if you are also interested to use this widget for Blogger blog then follow the steps.
How To Install Slideshow Widget To Blog
- Log in to Blogger dashboard.
- Click on your blog title and then choose Layout option from left side menu.
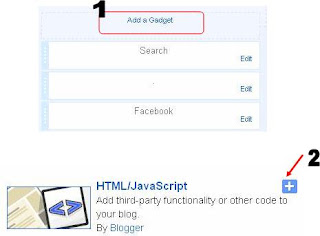
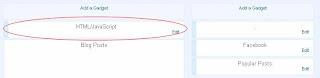
- Click Add a Gadget button and choose HTML / JavaScript from list.

- Now paste the following code within the text box appeared.
<!--Code at www.allbloggingtricks.com-->
<script src="http://ajax.googleapis.com/ajax/libs/jquery/1.4.2/jquery.min.js" type="text/javascript"></script>
<script src="http://s3slider-original.googlecode.com/svn/trunk/s3Slider.js" type="text/javascript"></script>
<script type="text/javascript">
    $(document).ready(function() {
   $('#btrix_slider3').s3Slider({
      timeOut: 3000
   });
});
</script>
<style>
#btrix_slider3 {
   width: 590px; /* Keep it 20px-40PX greater than ACTUAL Image size */
   height: 335px;
   position: relative;
   overflow: hidden;
   margin-left: 0;
}
#btrix_slider3Content {
   width: 590px;
   position: absolute;
   top: 0;
   margin-left: 0;
}
.btrix_slider3Image {
   float: left;
   position: relative;
   display: none;  top: 0;
   border:1px solid #ddd;
}
.btrix_slider3Image span {
position: absolute;
    font: 10px/15px sans-serif,Arial, Helvetica;
    padding: 10px 10px;
    background-color: #000;
    color: #fff;
    filter:'alpha(opacity=70)';
    -moz-opacity: .5;
    -khtml-opacity: .5;
    opacity: .5;
    text-align:justify;
}
.btrix_slider3Image span a {
text-decoration:underline;
color:#FE6602;
}
.clear {
   clear: both;
}
.top {
    top: 0;
    left: 0;
    width: 570px !important;
    height: 70px;
}
.bottom {
    bottom: 0;
    left: 0;
    width: 570px !important;
    height:90px;
}
.left {
    left: 0;
    top: 0;
    width: 110px !important;
    height: 335px;
}
.right {
    right: 0;
    bottom: 0;
    width: 80px !important;
    height: 319px;
}
</style>

<br />
<div id="btrix_slider3">
<ul id="btrix_slider3Content">
<li class="btrix_slider3Image">
<img src="http://3.bp.blogspot.com/-cWRM9k-TjHg/UWftkRbSjBI/AAAAAAAAC3Y/x51llDlRvkY/s1600/1.jpg" />
<span class="left"><h3>
HEADING HERE</h3>
DESCRIPTION HERE</span>
</li>
<li class="btrix_slider3Image">
<img src="http://2.bp.blogspot.com/-gGIB0ZidIHg/UWftkSVe-UI/AAAAAAAAC3c/oP81rya0UY4/s1600/2.jpg" />
<span class="left"><h3>
HEADING HERE</h3>
DESCRIPTION HERE</span>
</li>
<li class="btrix_slider3Image">
<img src="http://1.bp.blogspot.com/-3is-vmPTmGI/UWftkffjuHI/AAAAAAAAC3g/snGy5UH5zkw/s1600/3.png" />
<span class="top"><h3>
HEADING HERE</h3>
DESCRIPTION HERE</span>
</li>
<li class="btrix_slider3Image">
<img src="http://4.bp.blogspot.com/-rHjVa2jba_U/UWftlBmpHhI/AAAAAAAAC3w/8yMencJfHNY/s1600/5.jpg" />
<span class="bottom"><h3>
HEADING HERE</h3>
DESCRIPTION HERE</span>
</li>
<li class="btrix_slider3Image">
<img src="http://1.bp.blogspot.com/-f-3f9LZRVgg/UWftlJ5iqqI/AAAAAAAAC30/RzkkgDEe9bM/s1600/4.png" />
<span class="bottom"><h3>
HEADING HERE</h3>
DESCRIPTION HERE</span>
</li>
<div class="clear btrix_slider3Image">
</div>
</ul>
</div>
<br />
<!--Code at www.allbloggingtricks.com-->
- And drag this widget from sidebar to above the Blog Posts area as in figure below.

Modification
- Replace HEADING HERE and DESCRIPTION HERE with corresponding image details.
- If you want to use different image, change all URL with other image URLs.
How to Add Files to Google Drive Online
Google Drive, a virtual file-sharing service from Google, lets users upload, share and access their files from anywhere, either on their computer (on both PCs and Macs) or on a mobile device. Google Drive offers software applications for the following platforms: Windows, Mac OS X and Android devices and applications for the iPhone and iPad are coming soon. This article will walk you through the process of adding files to your Google Drive account via the web.
Steps
-
1Go to the Google Drive site and log in with your email and password.Ad
-
2Click the red “Upload” icon in the left column of your Google Drive page.
-
3Click the “Files” button, then double click the file you’d like to upload.
-
4Confirm your upload settings then click “Start Upload.”


Tips To Optimizing Blog Post Templates For SEO
 Last week I talked about optimizing the comment section of a blog post. After I published that article I thought, Wow, I just ignored the rest of the page! While the comments are important, there should also be a whole body of content above the comments that is also important as well. Therefore, I figured I would put together some tips this week for optimizing a blog post template for SEO.
There are other things that can be done to get increases in traffic from search engines, but these are some tips I see often overlooked and often needed.
Use HTML5
HMTL5 should really be used everywhere. But a blog post is one of the most appropriate places for it. This is because HTML5 takes advantage of semantic markup that defines all of the most important parts of a post. For example the <article>, <aside>, <nav>, and <header> tags are perfect for marking up blog posts. These HTML tags help search engines with page segmentation, and other forms of block level analysis. This is because by using the tags correctly, you are able to communicate to the engines what each piece of content is intended for.
Optimize For Authorship
There is overwhelming evidence now that pages listed in the results that have rich snippets supported by Google Authorship have higher click through rates. And it’s now easier than ever tosetup a page for authorship. I often hear clients ask if they can put authorship on product pages, or other none editorial pages. And the truth is, it really depends, but on blog posts it is almost always appropriate. So if you haven’t already, get your authorship setup today!
Link to Related Posts
Here at the Ninjas we are big advocates of internal linking. So much so we created an awesome WordPress plugin to make internal linking a lot easier. One of the most popular ways to increase internal linking is to link to related posts at the bottom of each post. There are a lot of great tools out there to help with this, but the key is to remember the more related each link is, the greater the chance of not only spreading link equity, but also increasing page views, and potentially conversions!
Use Correct Heading Tags
I know this tip seems obvious. But for some odd reason I still see many blogs not using their heading tags the right way. The main headline of the post should be in an H1 tag, and then any supporting headings should descend accordingly. This means that you shouldn’t use a H1 in your site name or logo.
Use Date
There is now a lot of evidence that shows that Google cares a lot about the date of a post or article. Providing the date the post was published in a standard format will help the search engines classify the post in a given date range. Which could help if all of your competitors for a given query have older content.
Subscribe to:
Posts
(
Atom
)


